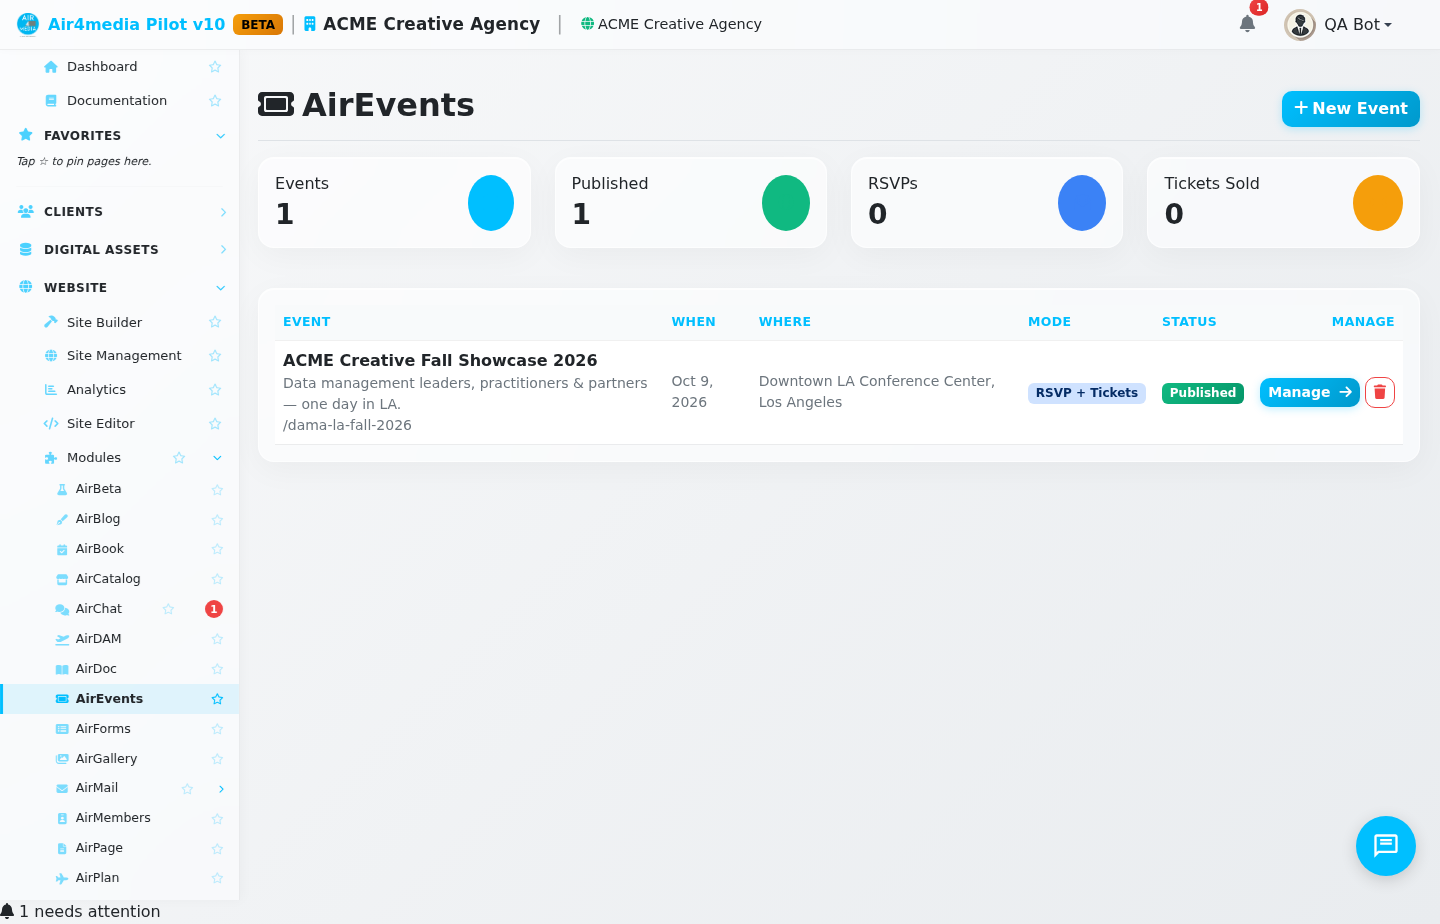
AirEvents
AirEvents lets you create and manage events — from simple RSVP-only gatherings to fully ticketed conferences with pricing tiers, discount codes, and online payment. When published, each event gets its own branded public page where guests can register, buy tickets, and view the schedule.
Key Features
- Event Dashboard: See all your events at a glance, with live totals for RSVPs and tickets sold. For ACME Creative Agency, this might show an upcoming client showcase alongside a team-only workshop — each tracked separately.
- Flexible Registration Modes: Choose RSVP-only, paid ticketing, or both — depending on what the event calls for.
- Ticket Tiers & Pricing: Create multiple ticket types (Early Bird, General Admission, VIP) with time-windowed pricing that automatically changes on a date you set.
- Discount Codes: Generate codes for percentage off, fixed-dollar discounts, complimentary (free) tickets, or a set price — with optional limits on how many times each code can be used.
- Guest List Management: Add guests individually or import from a CSV file. Track RSVP status (confirmed, pending, declined) and party size. Send invitation emails in bulk or one at a time.
- Agenda & Speakers: Build a full session schedule with tracks and rooms. Add speaker profiles with photos and bios.
- Sponsors: Organize sponsors into named tiers (Gold, Silver, etc.) and display their logos on the public event page.
- Attendee Check-In: On event day, mark attendees as checked in from the Orders tab. For group purchases, the confirmation email gives buyers a private link to name each guest (see Names and emails for every ticket below).
- Team Collaboration: Invite team members or external vendors to manage specific parts of an event — such as the speaker list or agenda — without giving them full account access.
- Public Event Page: Every published event gets a branded microsite covering the overview, agenda, speakers, sponsors, venue, and registration.
How to Use
- Open AirEvents from the sidebar and click New Event.
- Enter the event name, date, venue, and pick a registration mode (RSVP, Tickets, or Both).
- In the event's Details, fill in the description, then use the Event page section to shape how the public page looks and sells:
- Hero image: choose a picture from your media library. It appears beside the event title at the top of the page.
- Share image (optional): the picture shown when someone shares the page link. If you leave it empty, the hero image is used.
- Switches: turn the countdown to the start, the lowest ticket price, the member price, the numbers strip, and the Register bar on phones on or off.
- Registrations count: choose how many registrations you need before the count appears on the page. Enter 0 to never show it.
- Featured sessions: tick up to six sessions to spotlight near the top of the page.
- Search title and description: the words shown in search results and link previews. If empty, the event name and tagline are used.
- Landing page (optional): turn the page into a longer page built from sections. See Landing Page below.
- Go to the Tickets tab to create ticket types and set pricing. Add time-based price windows (e.g., Early Bird ends August 31) if needed.
- Use the Discount Codes tab to generate promo codes for clients, partners, or staff.
- In the Guests tab, add your invite list and send invitations by email.
- Build out the Agenda and Speakers tabs to give attendees the full picture.
- Click Publish to make the event live, then share the public event URL with your audience.
- On event day, use the Orders tab to check attendees in as they arrive.
Names and emails for every ticket in a group order
When someone buys more than one ticket, the registration page asks for the name of each extra guest, so every person gets their own ticket and their own check-in. This is always on.
Ask every guest for their own email
If you need to reach each guest directly (for reminders, badges or follow-up), you can also require an email address for every extra guest.
- Open your event and go to the Details tab.
- In the Event page section, check that Ask every guest for their own email (group orders) is on (it is on by default).
- Click Save details.
From then on, a buyer cannot finish a group order until every extra guest has a name and a valid email. This works the same way for paid tickets, free tickets and free passes. The option is on for new and existing events; you can turn it off for an event. When it is off, the guest email stays optional, and a guest who leaves it blank is listed with the buyer's email.
Fixing or completing guest details after the purchase
For any order with more than one ticket, the buyer's confirmation email includes a private link where they can add or correct each guest's name and email.
You can also send that link yourself. In the Orders tab, click the link button next to the order number of a group order. The link is copied, and you can paste it into your own message to the buyer. The link only opens that one order.
Getting the list
The Orders tab lists every ticket with the guest's name and email. Click Export CSV to download the full list, with each guest's details and the buyer's name and email side by side.
Landing Page
Every event page can use one of two layouts:
- Standard page: the ready-made event page, with your title, dates, speakers, featured sessions and a Register button. Nothing to set up.
- Landing page: a longer, story-style page you build from sections, one after the other, like a sales page for your event.
Your event keeps the Standard page until you switch. To switch, open the event's Details, go to Landing page, set Page layout to Landing page (sections below), and save.
Colours and fonts. Pick the band colour (the large coloured areas), an accent colour (buttons and highlights), the page background, an alternate background, and the text colour. Leave a colour empty, or click Use my brand, to keep your brand colours. You can also type the name of any Google Fonts family for headings and for body text, and choose rounded, pill or square buttons. Text on coloured areas is adjusted automatically so it stays easy to read.
Top of the page. Write a small label above the title, a headline, an intro sentence, the text of the main button, and an optional second button with its own link (for example to a section further down the page). Any field you leave empty uses your event's own name, tagline and dates. A caption can sit beside the speaker photos, next to the number of speakers.
Key facts. A strip under the top of the page shows the date, the time, the place and, if you fill it in, what the pass includes. You can turn the strip off.
Prices. The price line under the buttons comes from your ticket prices in Tickets & Pricing, so it always matches what people actually pay. You only choose the words beside each price (for example "general", "members", "students"). If you prefer, you can replace the whole line with your own sentence.
Featured speakers. Tick up to six speakers, put them in the order you want, and give each one a short caption. If you leave a caption empty, the speaker's title and company are used. The same speakers lead the photos at the top of the page. The rest of your speakers are summed up with a few faces and a link to the full speaker list.
Sections. Use Add a section to add a block to the page, then use Up, Down and Remove to arrange them. Each section can have its own background (light, soft, brand or accent) and a short id, so buttons and links can jump straight to it. The section types are:
- Highlights band: a band of short phrases that sums up the event.
- Numbered cards: up to six cards, numbered or not, for example what attendees will take away.
- Program stages: up to six moments of the day, each with a label, a time of day, a headline and a short text. Underneath, visitors can open the full day. This list follows your Agenda automatically, with times and speaker names; you can limit it to the sessions you tick.
- Speakers: your featured speakers with their captions.
- Callout: a highlighted message with a badge, a heading, a text and an optional link, for example a certification or a special offer.
- Partners: your sponsor banner or sponsor logos.
- Closing call to action: a final band with the date, a heading, a short text, the price line and the Register button. If you do not add one, a closing band is added for you, so there is always a way to register.
- Event description: the description you wrote for the event.
- Numbers strip: the real numbers of your event, such as speakers and sessions.
A section with nothing to show is simply left out of the page. To make words bold in a text, wrap them in double stars, like this: **two hours of hands-on practice**.
Venue Page: maps, parking and WiFi
The Venue tab of your event page always shows the venue's name, address, dates and a map. You can add everything else your guests need on the day: campus or building maps, parking instructions, WiFi details, directions or accessibility notes.
Open the event's Details and go to Venue page:
- Tab name: the name of the tab on your event page, for example "Maps & Parking". Empty = "Venue".
- Page heading: the title at the top of the tab. Empty = the tab name.
- Intro: a few words shown under the heading.
- Sections: use Add a section for each topic (for example "Parking", then "WiFi"), and Up, Down and Remove to arrange them. Each section has a heading, a text, up to six images from your library, and an optional button with its own link (for example "Pay for parking in advance"). The button needs both its text and a link that starts with https://.
Writing the text is simple:
- Leave an empty line to start a new paragraph.
- Start a line with a dash and a space ("- ") to make a bullet list.
- Wrap words in double stars to make them bold: **Lot P2**.
- Write the words to click to make a link, or paste a web address and it becomes a link by itself. Links open in a new tab.
Images are chosen from your library with Add images and shown whole, never cropped. On a phone they fit the screen, and guests can tap one to open it full size, which is handy for a parking map or a rates table.
The sections appear under the address and map. If you add no sections, the Venue tab stays exactly as before.
Guest Photos and Videos
Let your guests share the photos and videos they took at your event. Open the event and go to the Photos tab.
- Click Turn on guest uploads and choose when uploads close (two weeks after the event if you leave it empty).
- Copy the upload page link to put on a slide or a QR code at the venue. Anyone using it gives their first and last name and email.
- To ask everyone who came, write a short message and send it from the same tab. Each attendee gets their own personal link, so their name is attached automatically. Send yourself a test first. You can also schedule the email, call it off before it goes, or later send a reminder only to people who have not shared anything yet.
Every photo and video keeps the name of the person who sent it, and it gets thumbnails and previews. Videos also get a short animated preview and a written transcript. Location data is removed from the files. Guests tick a box allowing you to publish and use what they send.
Nothing is public. The files go into a private gallery for this event. Delete anything you don't want right from the Photos tab, and open the gallery to choose a cover, reorder or share it when you are ready.
Survey
Ask your attendees what they thought, in the Survey tab.
- Build the standard post-event survey gives you a ready set of questions written from your event: an overall rating, how likely people are to recommend you, their favourite sessions from your agenda, ratings for speakers, topics, venue, networking and food, the length of the day, ideas for next time, and ways to get involved.
- Start from a blank survey lets you write every question yourself. You can also use one of your existing forms.
- Add, edit, move or delete questions right in the tab. Answers can be stars, a 0 to 10 scale, one choice, several choices, or a written answer.
Send the survey by email from the same tab, now or at a time you choose. Each attendee gets a personal link, so every answer shows who gave it, and people can come back to change their answers. A reminder can go only to those who have not answered. There is also an open link for a QR code or a slide; answers given through it are anonymous.
The results appear in the tab as they come in: averages, the recommendation score, how many people picked each choice, and the written comments with each person's name.
Check-in at the Door
The Check-in tab is made for a phone or tablet at the entrance.
- Scan or type the code from a guest's ticket and press Check in. The screen tells you who it is, or that they are already in and since when.
- Or search for a name, email or company and tap Check in next to the person. Undo reverses a mistake.
- The counter at the top shows how many guests have arrived.
Door volunteers do not need an account: in the Team tab, give someone a secure link with only Check-in ticked. They see the check-in screen for this event and nothing else, not your orders or your money.
What Your Event Made
The Orders tab shows the money for the event: ticket revenue, the Quick sales made at the event (for example T-shirts sold at the table), and the Total made.
When you use Quick sale, pick the event at the top of the screen. Today's event is chosen for you, and your last choice is remembered on that device. Choose No event for a sale that has nothing to do with an event. Only sales that are actually paid count in the total.
Tips
- The group discount field applies a percentage off automatically when someone buys multiple tickets in a single order — great for team registrations.
- The stat cards on the dashboard are clickable: tap RSVPs to filter to events with confirmed responses, or Tickets Sold to sort by sales volume.
- For internal events where you don't want public sales, set the mode to RSVP Only and send invitations directly from the Guests tab.
- Your images are never cropped. They are always shown whole, at their own shape, so landscape pictures give the best result at the top of the page.
- No hero image yet? The page still looks finished: it uses your brand colours and your speakers' photos instead of stock pictures.
- The numbers on the page are always real: speakers you have published, sessions that have a speaker, and registrations only once they reach the number you chose.
- The price shown ("From ...") is the lowest price anyone can buy without a discount code or proof of eligibility. Member prices only appear if you turn that switch on.
- Collaborator invite links are event-scoped — they grant access only to one event and the specific sections you choose, keeping the rest of your account private.