Booking Settings
Configure how clients book appointments with you — set your available hours, define appointment types, and share your personal booking link.
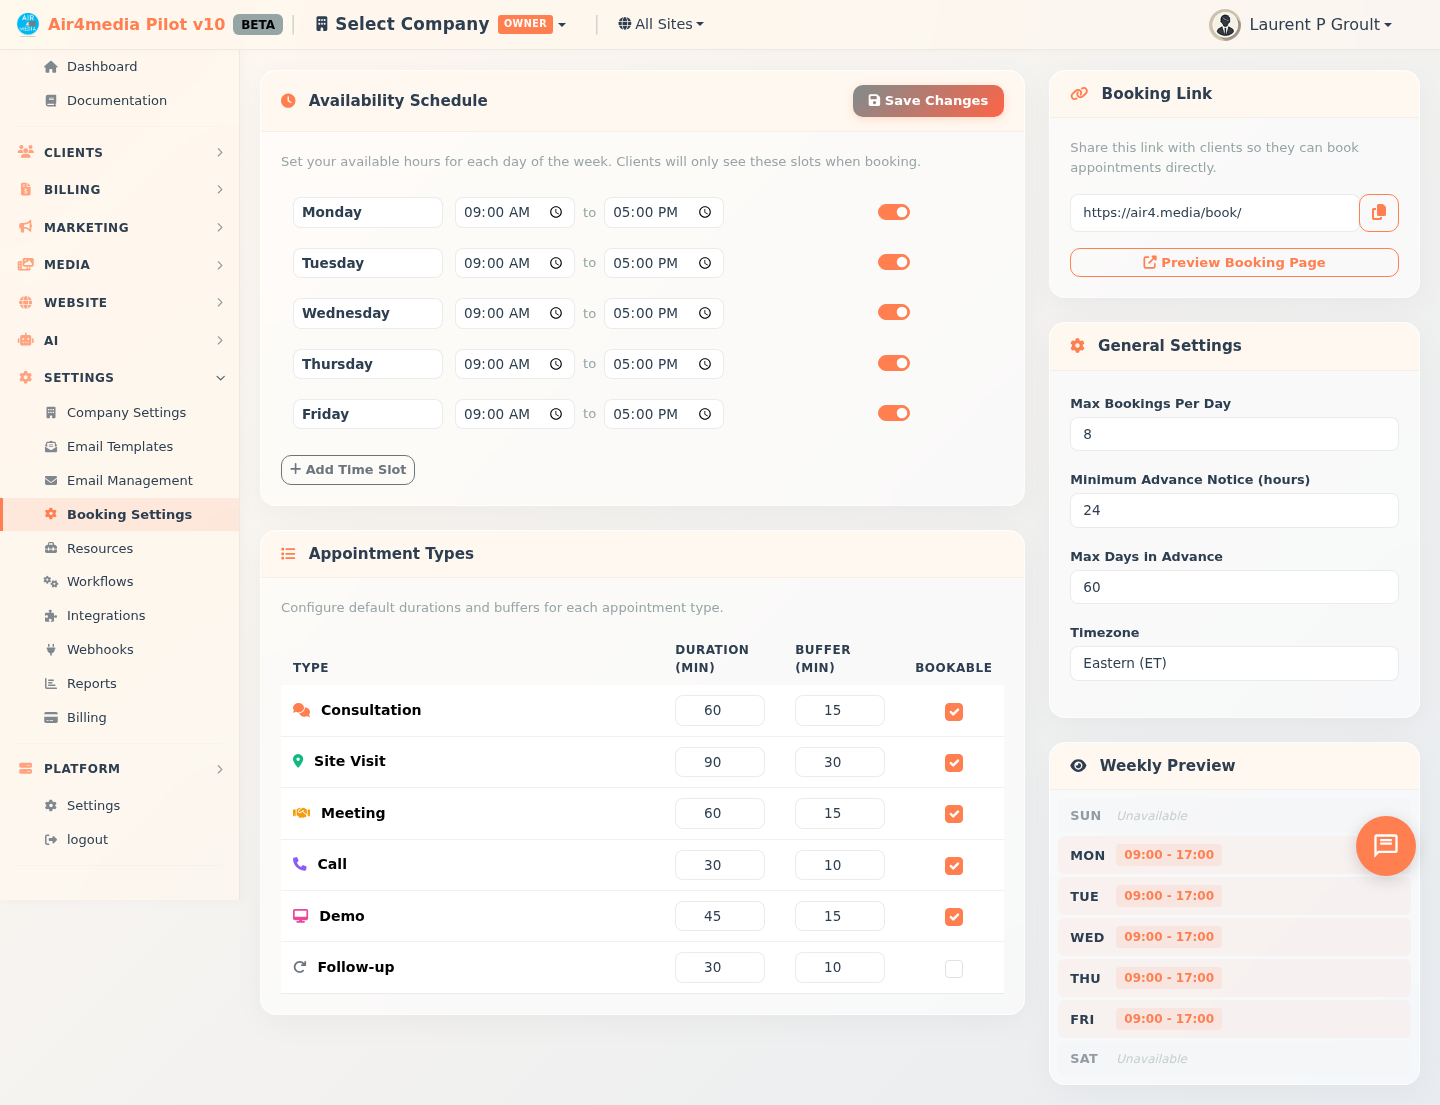
Key Features
- Availability Schedule: Define which days and hours you're open for bookings. Clients only see time slots that fall within your schedule. ACME Creative Agency starts with Monday–Friday, 9 am–5 pm by default.
- Appointment Types: Set default durations and buffer times for each meeting type (Consultation, Site Visit, Meeting, Call, Demo, Follow-up) and choose which ones clients can request.
- General Settings: Control your daily booking limit, minimum advance notice, how far ahead clients can schedule, and your timezone.
- Booking Link: A shareable URL clients use to self-book directly on your calendar — copy it and drop it in an email or on your website.
- Weekly Preview: A live summary on the right showing each day as open or unavailable as you edit your schedule.
How to Use
Set Your Availability
- Go to Booking Settings in the sidebar.
- In the Availability Schedule section, each row is a time block. New accounts start with Monday–Friday, 9 am–5 pm.
- Select the day from the dropdown, then set the start and end times.
- Use the toggle switch on a row to enable or disable that block without deleting it.
- Hover over a row to reveal the trash icon, then click it to remove that block permanently.
- Click Add Time Slot to add more blocks — useful for split schedules (e.g., a morning and afternoon window on the same day).
- Click Save Changes in the Availability Schedule header when done.
Configure Appointment Types
- In the Appointment Types table, find the type you want to adjust.
- Set the Duration (minutes) — how long that appointment lasts.
- Set the Buffer (minutes) — the gap after that appointment before the next can start.
- Check or uncheck Bookable to control whether clients can request that type. Follow-up is off by default.
Update General Settings
- In the General Settings panel on the right, set:
- Max Bookings Per Day — your daily cap on appointments (default: 8).
- Minimum Advance Notice — how many hours ahead a client must book (default: 24).
- Max Days in Advance — how far into the future clients can schedule (default: 60).
- Timezone — your local timezone so availability displays correctly for you and your clients.
Share Your Booking Link
- Copy the link shown in the Booking Link panel using the copy button.
- Share it via email, your website, or wherever clients reach you.
- Click Preview Booking Page to see exactly what clients will see before sharing.
Tips
- Add two time blocks for the same day if you take a midday break — for example, 9 am–12 pm and 1 pm–5 pm.
- Buffer times protect you from back-to-back appointments with no break in between.
- Set a minimum advance notice (e.g., 24 hours) to avoid last-minute booking requests.
- The Weekly Preview updates live as you edit — check it before saving to confirm your schedule looks right.
- Uncheck Bookable on types you handle internally (like Follow-up calls) to keep your public booking page focused on what matters most to clients.